
Introduction
If you are a member of staff, 4th year or postgraduate student, you can use the StReP system should you wish to do so. Everyone who wishes to use Strep to recruit participants must contact the Psychology Technician to be given access to Strep as researcher
Important Note: only participants who sign up to studies through strep can be given credits. If people participate to studies outwith Strep (e.g. by clicking on a link in a email, or by completing a questionnaire in-class, e.t.c.) they will not be given credits and the researchers must be clear to their participants about that. Anything else will be treated as deception
My Studies
This option takes you to a page where you can view Study Information and Timeslots, contact your participants, or change the information that you display to participants about your study. The “Time Slots” option under the “View” column allows you to add or delete timeslots for which nobody has signed up. You can also use this page to manually award StReP credit to participants.
Important Note 1: remember, for lab studies, the system does not automatically grant credits. You have to do this manually within 48 hours after participation took place. For online studies (Surveylab, Pavlovia/Psychopy, Psytoolkit, JISC Online Surveys) contact the technician to setup automatic credit granting or point you to support pages/tutorials.
Important Note 2: Participants are giving you their time to support and contribute to your research. If appropriate, you must ensure you credit them for their participation. You should receive email reminders for uncredited contributions. Students information asks for one week’s grace to allow you to credit them.
All Studies
This option shows you a list of all the studies; all (active and inactive), active studies (visible to participants) and inactive studies (invisible to participants).
Add New Study
Typically, you will either choose a “Standard Study” (which takes place in one of the psychology labs) or an “Online External Study” such using the Surveylab online survey tool. In both cases, and most likely, you should choose the “credit” option.
You will then complete a form to add your study to the system. Fields you must filled in:
- Study name
- Description of the study (3-4 lines)
- Duration and number of credits (consult the table below – this will be reviewed by the technician when you send it for approval)
- SSoS Ethics Committee Approval Code – This is mandatory, not optional
- Any eligibility requirements if necessary
- Click the ‘yes’ button next to ‘Active Study’
- If you use Surveylab you must also enter the URL to your survey in the “Study URL” field. Also, watch the video titled “Publish and download Data (Psychology)“
| Session Duration | Number of credits |
|---|---|
| 0 – 15mins | 0.5 credit |
| 16mins – 30mins | 1 credit |
| 31mins – 45mins | 1.5 credit |
| 46mins – 60mins | 2 credits |
- Under the advanced settings, if you have ethics approved to recruit Worldwide, then choose “All Courses” in the “Course Restrictions” section. Otherwise, you must choose the RMA courses for the campus you have ethics approved for – open tab below for instructions.
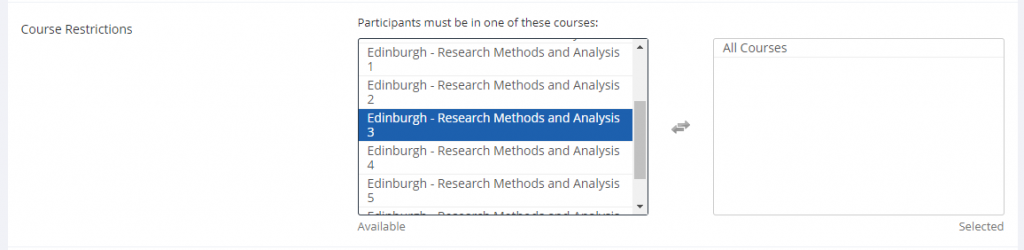
Now you should move all the available courses on the left box for your campus only. You can do this by clicking on each course on the left and the course will move to the box to the right.
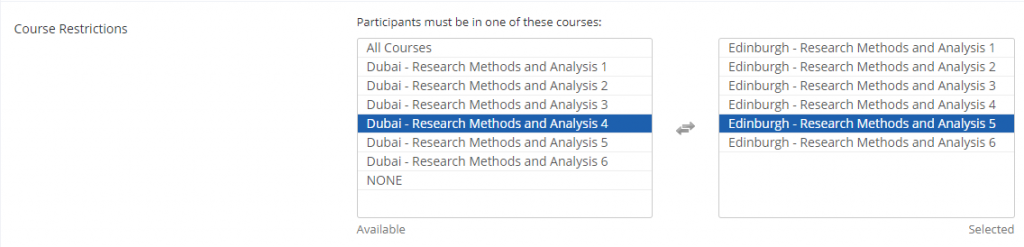
So, if you are based in Edinburgh, and you do not have ethics approved to recruit worldwide the final result should look like the image below.
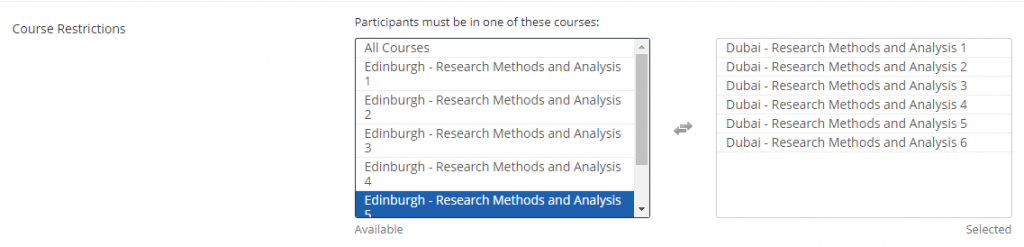
If you are based in Dubai, the final result should look like the image below.
- Once you Save the changes you will be taken to a new page showing a summary of your study.
- Next, click on “Study Menu” and choose “View/Administer timeslots”. This will set up testing sessions that participants can sign up for.
- Depending on the type of study you created i.e. online Vs standard lab study, the way to create timeslots is different.
- In an online study, you just need to set up the study’s deadline – after which participants will not be able to sign up to your study via strep – and the maximum number of participants. Whichever of these two is reached first, the study will not be available via strep. You can modify these two fields at any time. To add timeslots click on Study Menu –> View/Administer timeslots and then select Add A Timeslot on the top right. Enter the right information for the Final Participation Date, Final Participation Time (this field rarely matters so better leave it as is) and the Max. Number of Participants.
- In a standard lab study, you may wish to add individual timeslots, but usually you will need to set up several testing sessions at once. To do so, click on Study Menu –> View/Administer timeslots, Add multiple timeslots and then enter the number of testing sessions you wish to carry out, the start date, start time (which MUST be in 24 hour clock format), and the free time between slots (e.g. to give you time to reset equipment, have a rest etc. typically 15 mins). Then select the room from the Location List (remember, you can only use the labs within business hours i.e. 09:00 – 17:00). All labs’ names are prefixed with the campus name they are located at, so be careful not book a lab in another campus. Click Add. The next page will show you if the selected lab is available or not as shown in the last column. If you are happy then click on Add Selected Timeslots.
Important – This will not book the lab, it will only show the participants where to go. To book the lab visit Book Laboratory Facilities service.
Repeat to add timeslots for different dates - Once you have finished setting up your study and have added timeslots, return to the study summary (Study Menu –> Study information) and click on the “Send Request” button.
My Profile
Use this option to change your password or update your contact details.